As a landscape shooter I often wonder whether old rules for DOF still apply to current small pixels and sharp lenses. I therefore roughly measured the spatial resolution performance of my Z7 with 24-70mm/4 S in the center to see whether ‘f/8 and be there’ still made sense today. The journey and the diffraction-simple-aberration aware model were described in the last few posts. The results are summarized in the Landscape Aperture-Distance charts presented here for the 24, 28 and 35mm focal lengths.
I also present the data in the form of a simplified plot to aid making the right compromises when the focusing distance is flexible. This information is valid for the Z7 and kit in the center only. It probably just as easily applies to cameras with similarly spec’d pixels and lenses.
f/stop Charts for 24, 28 and 35mm Focal Lengths
Bottom line, for a given focusing distance, stick to an f/stop at the edges of the pink area for best resolution based on one of three Depth of Field strategies:
- maximize sharpness at the focusing point, where the subject might be located;
- maximize sharpness in the distance; or
- simply go for maximum DOF, which pretty well corresponds to nearest acceptable sharpness (MTF50 greater than 50 lp/mm).
Here is the Aperture-Distance chart for the 24mm focal length:

The dashed lines represent the distance at which the sharpness Near Limit threshold of MTF50 at 50 lp/mm is crossed with each strategy, read the appropriate color off the right axis. To understand how the charts are derived refer to the previous article.
None of those strategies is necessarily better or more desirable than others (see the f/11 section further down for example), though they each have their place. As you move from one end of the purple range to another you are favoring sharpness in the direction you are moving at the expense of where you are leaving from. Just be aware that if you do go outside of the f/stop range bounded by the colored solid lines it behooves you to understand why you are doing so because resolution is most likely given up compared to staying inside of it.
The chart for the camera and lens at a focal length of 28mm:

And at 35mm:

As focal length goes up DOF becomes shallower for a given focus point so it often does not make sense to maximize sharpness at a distance when focusing nearby. Those are cases where it is usually best to maximize sharpness at the subject or go for DOF, effectively capping working f-numbers at f/11 in practice. Nevertheless if you squint you can see dots indicating where the Distance lines would have been had the chart not been capped at the best DOF f/stop, in case you wanted to maximize resolution at a distance when focusing close by.
So the next question comes naturally. Are there any other reasons why a landscape photographer with a similar setup might want to go beyond f/11? I would be interested in your opinion.
f/11, the new f/16?
Some have suggested in the past that since the diffraction blurring function (our friend Airy) is known and well behaved it is possible or even desirable at times to capture blurrier images at higher f/stops for some good reason, say f/22, to then bring them back to their ‘original’ sharp splendor through multiple applications of satanic rituals in post processing.
I have two thoughts about such an approach. First, with today’s Z7-class pixel/lens combinations at these focal lengths, the kit is pretty close to pixel-diffraction limited where focusing by f/8. Beyond that physics takes over and we lose about 15 lp/mm of resolution with each stop down, with obvious consequences to captured sharpness – not to mention noise and artifacts when sharpening in post. See for instance the solid blue curve in Figure 6 in the previous article.
Second, I am trying to come up with a reason for shooting higher than f/11 with this setup. Those apertures are for all intents and purposes pixel-diffraction limited at the focus point with wide focal lengths so they also can just as easily and effectively be ‘improved’ by sharpening in post. Plus they give better sharpness and better DOF than anything above them. Why would anybody willingly throw away good IQ by shooting at f/16-22, only to then attempt to reconstruct it by at best guesstimating in post what the detail that was thrown away could have been, all the while introducing artifacts? If I am missing something let me know.
Sebastian suggests in the comments below that at focusing distances shorter than 5m there may be some benefit in far resolution beyond f/11, as can be gleaned from the 1-3m plots in the previous article and the dots you have to squint for in the charts above. Good point, though apparently a lesser of two evils given the palliative resolutions involved. He also says that, when focusing at a distance, using higher f-numbers will bring the Near Limit closer. Also a good point if you are willing to live with lower resolution throughout the rest of the depth map. What’s your MTF50 threshold for ‘acceptable’ sharpness? If it’s much lower than the 50 lp/mm used in this series the recommended f-numbers would change somewhat.
As for me, it seems that I will no longer be stopping down past f/11. For additional reinforcement, a pen pal who saw my post kindly wrote to say that legendary adventurer-photographer Galen Rowell taught him back in the ’90s to use f/11 and to focus in the foreground, typically 1.5-2m (4-6′) away. “One reason Galen emphasized forward focus is that this let infinity go just a bit on the soft side, and provided an additional depth cue”. Thanks, pointer and historical note much appreciated.
If Focus Distance is Flexible
So Galen suggested focusing nearby, which makes sense because we typically expect the foreground in a photograph to be sharpest. Resolution where one focuses is almost always the best it can be for the setup – and varies little with focus distance for a given f/stop.
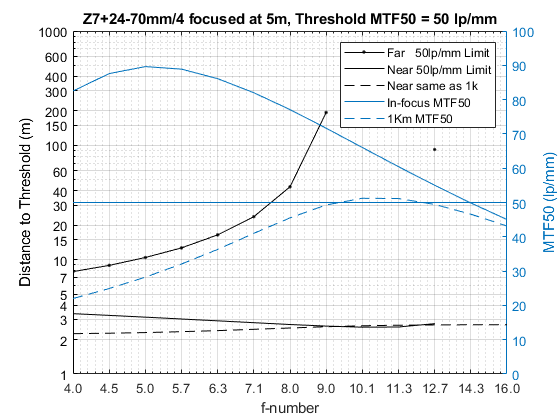
As we scan the scene to determine the best focus point in a landscape, the most relevant auxiliary variables are therefore often the Near Limit (here taken to have MTF50 resolution higher than 50 lp/mm) and resolution in the distance (here taken to be 1Km away). The following plots summarize their interaction with aperture, for the kit at a focal length of 24mm:

Focus at 2, 5 or 10m – and at what f/stop? A glance at this chart should provide an idea of the main trade-offs involved. The black lines are the Near Limit distance in meters at the shown f/stops, read off the left axis. The blue lines are the corresponding resolution in the distance in lp/mm, read off the right axis.
So with this plot, for each f/stop and focusing distance we know from where the image starts being acceptably sharp (black lines); that it is sharpest around where we focused; and its resolution at infinity (blue lines). Not very intuitive to read, I know, but choose your poison.
At a focal length of 28mm:

And 35mm:

There is a massive amount of data and many more conclusions to be drawn from it. If you can think of additional ways to present this data in a more intuitive fashion for Landscape Photography, I would be glad to hear your thoughts.
PS The Matlab code used to generate these plots can be downloaded from here.
Jack
First of all many thanks for the mini-series you have been writing and whilst this response won’t speak directly to your work, I hope it will add something along side it.
Like you I have used some of Norman Koren’s work to inform my depth of field work, which splits into two domains. First, and the one I won’t talk about here, is using ‘complex’ equations for the depth of field in the camera, through the Lua scripting using Magic Lantern. This means I don’t need to make simplifying assumptions: I just need to use the ‘right’ maths.
However, your work, and others, has re-enforced a second, more pragmatic approach that I have ‘worked out’, that I call ‘The Rule of Ten (RoT)’, although its an old idea.
The Rule of Ten approach is based on focusing by using the infinity blur, ie the so-called Circle of Confusion (C), and the short form of the hyperfocal, ie f*f/(N*C), where f is the focal length and N the aperture number, which when using the RoT, you (initially) place at F/10.
The RoT focus distance in meters, is simply the focal length in mm, divided by 10, and at a CoC of the focal length in mm, as microns.
Thus a 24mm lens, at F/10, has a (hyperfocal) RoT of 24/10 = 2.4m, and the infinity blur, ie CoC, is 24 microns. Nice a simple and doable in your head.
From here you can adjust the RoT according to your needs. For example, if I wanted to get the background as sharp as I could, which I take as two sensor pixels, ie 1 sensor-based line pair, I would adjust the RoT according to RoT CoC. As an example, my 5D3, sensibly has a sensor lp ‘limit’ of about 12 microns, ie two sensor pixels. Thus all I would do is adjust the RoT and focus at twice that distance, ie 24/12.
The RoT approach is best used at the wide end, but can be used longer. For example, a 80mm lens at F/10 has a RoT of 7m, but, of course, the CoC, ie infinity blur, is 80 microns, which clearly needs adjusting. So let’s say we wish to bring the infinity blur down to, say, 20 microns, ie a quarter of the RoT. So all we need to do is focus at 4 times the RoT, ie 32m away. But, as I say, the RoT is ‘best’ suited for focal lengths shorter than, say, 30mm.
Finally, knowing the (adjusted) RoT, you know the near deph of field, ie RoT/2. If this is not going to cover for depth of field, then an option I would use is to focus bracket, but informed by the RoT. That is simply bracket at RoT/3, RoT/5, RoT/7 etc.
As an example, take the 24mm case above. The RoT is 2.4m at F/10, with an acceptable CoC (infinity blur) of 24 microns (Full Frame). But if I had a near field object at, say, 0.6m, I clearly could cover this with one shot. But a RoT/3 shot will give me a near DoF at RoT/4, ie 0.6m. Once again, all simple maths that can be relatively easily carried out in your head.
Anyway, I stop here as you can read about the RoT approach and the Lua scripts on my blog at photography.grayheron.net.
Once again, thanks for your work and taking the time to publish it; I for one have found it of value. It’s important for me to know the maths, but, practically, we need to put it in the background, if you forgive the pun; as in the field, a simple, in your head approach is needed, eg the RoT approach.
Cheers
Garry
Hi Garry,
Neat, the Rule of Ten, I had not heard of it before, I’ll try it out. You are absolutely correct that the described approach cannot be done in one’s head and it’d be great if some variation of it could. Alas, I have not been able to come up with any generalizable simple rule yet, just graphs. Heck I haven’t really tested its sensitivity to know how it generalizes to more than just Z7+kit-class equipment. I was hoping to be able to distill it down to a couple of tables only to carry in my phone or wallet but whenever I try to answer a simple question like the one just below I keep going back and forth to several.
Anyways, thanks for your kind words, I’ll look into your blog, it looks like there is a lot of interesting stuff there.
Jack
Jack
I really would welcome others ‘testing out’ the RoT method, ie based on knowing your infinity blur zone, eg the normal CoC to, say, 2 sensor pixels or slightly less.
The RoT works well as tool for landscapes, as it simply informs my infinity focusing, eg at between 2 to 3 times the ‘normal’ CoC, and my focus bracketing, ie at RoT/(2n-1), where n is the nth focus bracket, and the near DoF at the nth bracket is RoT/(2n).
BTW the RoT term is one I coined.
Cheers and stay safe
“I am trying to come up with a reason for shooting higher than f/11 with this setup.”
If the goal is maximizing sharpness/DOF and optimal equipment and technique are employed, there probably isn’t a good reason. If not, I can think of several:
– Largest DOF does not imply least amount of blur in the picture. While stopping down past f/11 may harm peak sharpness and DOF, out-of-focus areas will still get less blurry. That may lead to an overall impression of a sharper image in some cases – especially if output size is modest relative to the capabilities of the camera, which is often the case nowadays.
– Of course, plenty of things can lower actual sharpness within the DOF – subject movement, focus or autofocus error, lack of tripod, bad technique… If you suspect beforehand that your shot will probably not realize the full sharpness potential of your system anyway, stopping down further than your charts suggest may still yield a sharper image than shooting at a theoretical best aperture (and focus position).
Of course, “empirical” sharpness fanatics like Lloyd Chambers have very much shown the same thing you show by mathematical means: with a reasonably high-res FF camera and good lenses, stopping down past f/11 or f/13 or sometimes even f/8 will not only hurt sharpness where focused but DOF as well, so if largest amount of sharpness in the picture is what you’re after and your technique is good, you’ll only lose with smaller apertures.
Hello Sebastian,
Good point on far resolution – at focusing distances of less than 5m with a 24/28mm focal length. If you squint you can see the ‘Distance’ dots in the first three charts above, indicating optimal f/stops for that objective.
Beyond 5m, every stop higher than f/11 at 24/28mm will result in lower resolution at infinity, as you can see by the dashed blue line in the relative plot from the last post.
The loss of resolution at infinity only gets worse at longer focusing distances. Point well taken, I will make clarifying corrections where due above.
I had given some thought to your second point and my conclusion was that some form of motion/vibration should not change the calculus: it may water performance down a bit, but in the end the MTF curve of the anomaly would simply multiply itself into the existing ones and degrade all scenarios in the same way. So the conclusion should not change, right?
Very good thoughts, much appreciated.
Jack
Jack,
the effect I’m referring to is not limited to focusing distances below 5 m, even at 24 mm. You are perfectly correct that if I focus further out, I will get increasingly clear losses at infinity with f/16 versus f/11. In that sense, my previous statement was overgeneralized and what I’m seeing with quick-and-dirty testing is completely in line with what the graph from the previous article shows, and with your general recommendation of f/11 as the smallest sensible aperture for this setup. However, just as focusing very close will change things for (near-)infinity, focusing near infinity will change things for very close objects. To make this extremely obvious, just include an object, say, half a meter away in a shot and focus far in the distance. The close object will dramatically benefit from stopping down past f/11; even f/22 will render it much sharper – or rather less blurrier – than f/16.
Of course, that is an extreme example, and one might debate if it applies to any instance of actual landscape photography; but for one I don’t see why one should discard this use case a priori, and more importantly, between the extreme case(s) and the more moderate cases that you describe above, I would expect there to be a gradual transition from very small apertures being advantageous to them being hurtful for sharpness (or rather, amount of blur) in out-of-focus areas. In fact, I think it would be very helpful if this could be visualized somehow since that would clarify when you can just rely on f/11 as the smallest sensible aperture and when your photograph crosses over into edge cases where smaller apertures might still have benefit. But I’m not sure if it would be possible to put that into a single graph since there would be more variables than in the graphs you show in these articles.
On the second point, you are probably right. If f/16 is worse than f/11 to begin with, any additional blur surely can’t reverse that; at most it would even things out a little, but that wouldn’t constitute a reason to stop down past f/11. I first thought focus error might be a different case since that is not actually blur but a shift in the DOF; that you might resonably dial in f/16 instead of f/8 or f/11 to cover for, say, an anticipated autofocus error. But then f/16 would have to have a larger DOF than f/11, and of course it was one of the points of the whole exercise to show that (for this particular setup) it doesn’t. So any benefit f/16 might have in such instances reduces to my first point.
Sebastian
Hi Sebastian, thank you for your testing, I am glad that practice matches my ideal exercise.
As for focusing in the distance at higher f-numbers to bring up sharpness very close by, you are of course correct. This can be evinced from the admittedly difficult to read Figure 5 in the previous article. Perhaps this simplified version specifically addressed at your example above makes it easier to visualize:
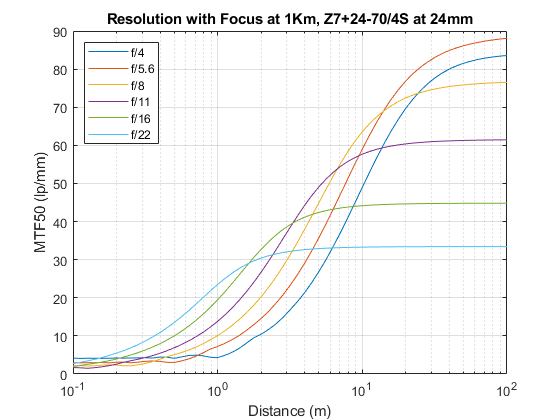
As you can see f/11 is the aperture that meets the self-imposed threshold of MTF50 at 50 lp/mm closest to the lens. Of course higher f/stops will also work if one is willing to live with less sharpness in the rest of the image. f/11 still produces the closest Near Limit at 40 lp/mm but at 30 lp/mm f/16 is closer, gaining 0.56m. By 20 lp/mm f/22 is it – but is 0.24m worth the resolution hit elsewhere? What about the 0.56m?
The issue with DOF related decisions is that there are too many variables and too much data involved in coming up with the ‘best’ compromise. The plots following Figure 5 are an attempt at dimensionality reduction, to synthesize information from a multitude of such charts into a manner relevant to landscape photography. In the end the Near Limit threshold of 50 lp/mm is an easy way to say ‘acceptable or ‘not acceptable’, but of course there are many shades of gray between the two. If you can think of an easy, readable, generalizable plot to make the grays more evident and/or intuitive send me an email via the About tab top right and I will try to code it up.
Jack
“The issue with DOF related decisions is that there are too many variables and too much data involved.”
Very much so, and my original point was kind of that it gets even more difficult when you consider that out-of-focus areas also contribute to the impression of sharpness in a photograph (in various ways). So if you ask “How low will you go?”, my answer is that it depends on the picture I’m trying to make. If my goal is to achieve a large DOF while more or less realizing the sharpness potential of a 45 MP FF camera + top notch lens, I’d probably go with your threshold of an MTF50 or 50 lp/mm and resulting recommendation of (no smaller than) f/11. In some cases though, it might be advisable to ease up on the sharpness requirement in order to avoid overly blurred elements at very close (or very far) range. In such cases, I’m not sure it even makes sense to stick with MTF50; my guess is that something like MTF90 would be more appropriate. (In fact, I’d be very interested in how the latest graph (resolution with focus at 1 km) would look for MTF90, and whether the relative performance of the apertures would look different.)
As for “visualizing the grays”, I don’t have any ideas on how to cram that much information into one chart, and I suspect the best one can do is what, basically, you’ve been doing already – calculating different scenarios and presenting the results in sequence. (Your Aperture-Distance Sharpness Charts are an amirable attempt to distill a wealth of information into one chart, but I must admit I find it difficult to interpret – I’m not even sure I’ve yet understood every aspect of it.) But all of this made me remember a DOF calculator I once had on my phone that let me visualize sharpness vs. distance for any input of focal length, aperture, focusing distance, and circle of confusion. Of course, it did not take diffraction into account, but it was highly instructive to play around with it and see what the sharpness curves looked like for various combinations. One of the key takeaways for me was precisely a point I’ve been making here, that the way sharpness falls off outside the DOF can vary hugely depending on focal length and focusing distance (and to a lesser degree, aperture). I think if something like that were available with diffraction taken into account, it would very much help visualize and explore the “grays”, and sharpness vs. distance behavior in general. But I suspect that implementing such a calculator (say, on a webpage) would be an entirely different matter than using Matlab to derive specific graphs…
Roger that, Sebastian, as far as I know Matlab does not have a free online interpreter WordPress could link into. If it did, I’d give it a stab.
As for MTF90, this series is about sharpness when pixel peeping: MTF50 is not a bad proxy for that, unlike MTF90.
Jack
Hi Jack, I’ve only recently discovered your site and am really enjoying the useful information you’re providing. My question is if shooting landscape with a longer lens, (e.g., 50 + mm), assuming all else is held equal regarding focus distance, etc., would that mean you should stop-down more so the colored area in the Aperture-Distance Sharpness Chart would essentially shift upwards? Maybe it’s not as simple as that but wanted to ask if that might be true in a general sense? Thanks, Charles
Hello Charles, thanks for the kind words. If I understand your question correctly the ideal bands will not move up, if anything they will extend to the right. Keep in mind that if you increase focal length, DOF decreases as its square all else equal: DOF ≈ 2cN(u/f)^2.
On the other hand if you are shooting landscapes with a long lens (say a 135mm f/2 apo like Zeiss’) your target is likely going to be farther than what I am showing for the lower focal lengths so the calculus changes substantially.
In that case you are better off focusing on the target at the sharpest f-number of the lens – up to f/11 for max DOF. By f/16 most lenses don’t make it up to the 50 lp/mm threshold in a digital camera, so unless you are willing to live with that throughout your image don’t go there.
Jack
Thanks, Jack. Makes more sense now. Time for some more shooting/experimenting!