After an exhausting two and a half hour hike you are finally resting, sitting on a rock at the foot of your destination, a tiny alpine lake, breathing in the thin air and absorbing the majestic scenery. A cool light breeze suddenly rips the surface of the water, morphing what has until now been a perfect reflection into an impressionistic interpretation of the impervious mountains in the distance.
The beautiful flowers in the foreground are so close you can touch them, the reflection in the water 10-20m away, the imposing mountains in the background a few hundred meters further out. You realize you are hungry. As you search the backpack for the two panini you prepared this morning you begin to ponder how best to capture the scene: subject, composition, Exposure, Depth of Field.

Depth of Field. Where to focus and at what f/stop? You tip your hat and just as you look up at the bluest of blue skies the number 16 starts enveloping your mind, like rays from the warm noon sun. You dial it in and as you squeeze the trigger that familiar nagging question bubbles up, as it always does in such conditions. If this were a one shot deal, was that really the best choice?
In this article we attempt to provide information to make explicit some of the trade-offs necessary in the choice of Aperture for 24mm landscapes. The result of the process is a set of guidelines. The answers are based on the previously introduced diffraction-aware model for sharpness in the center along the depth of the field – and a tripod-mounted Nikon Z7 + Nikkor 24-70mm/4 S kit lens at 24mm.
24mm Landscape Aperture Guideline
The number of variables involved in addressing this problem satisfactorily is very large therefore we will set aside artistic considerations and simplify things by initially assessing spatial resolution clinically at three key distances from the front of the lens for a given focusing distance:
- sharpness at the focusing distance where the main ‘subject‘ may be located
- sharpness in the background, a far distance away, here taken to be 1 Kilometer away, and
- the nearest distance that can be considered to be acceptably sharp (defined to have MTF50 resolution higher than 50 lp/mm).
The results are summarized in the aperture versus focusing distance 24mm guideline chart below. These are valid for the mentioned equipment and setup but I believe they would most likely apply to any full frame camera with a similar sensor and lens at 24mm, in the center.

Bottom line, for a given focusing distance choose:
- the f/stop at the lower edge of the purple area if you want the in-focus plane, where the subject might be, to be as sharp as it can be
- the f/stop at the upper edge of the purple area if you want the background in the distance to be as sharp as it can be
- f/10 – if you want ‘acceptable sharpness’ nearest to the camera, regardless of focus distance (this often coincides with best DOF)
If you go outside of the colored area make sure that you know why you are doing it because you are losing resolution compared to staying inside of it. Come to think of it, are there any landscape scenarios that would justify using an f/stop higher than f/10 at all?
Understanding the Aperture/Distance Chart
The chart shows the f/stop working range at a number of typical focusing distances. For example, if the main subject is 7 meters away the f/stop working range for our setup in the center is from a minimum of f/5 to a maximum of f/9, with f/5 maximizing resolution at the subject and f/9 at a distance far away, taken here to be 1 Km. Outside of this range little or no benefit is obtained according to the objectives of maximizing resolution at the subject, at a distance or near the photographer. Using apertures outside of the indicated range gives up resolution.
Other than for artistic considerations, the only reason one may wish to step outside of the range is if they need an f/stop with the absolute closest DOF Near Limit to the camera for the required focus distance. This case is indicated by the faint dotted line in the chart. Even then, other than at the closest focusing distances, the benefit is often marginal compared to far-favoring f/stops. Interestingly for our setup the f/stop that achieves the nearest resolution limit to the camera is the same for all focus points, f/10, so this is a handy f-number to know for this kit. It turns out that it is true at all focal lengths for this lens. What landscape scenario would require an f/stop higher than f/10?
Stepping away from one end of the range and moving towards the other enters the purple compromise area where resolution at the in-focus Subject (S) or at a Distance (D) is more or less favored. Depending on focusing strategy (favor sharpness at the Subject or at a Distance far away) the best performance is at the respective end of the range. However the edges are shown as 1/3 of a stop bands because there is often little difference in the first 1/3 of a stop change in f-number, due to the slowly varying curves around their respective maxima, as can be seen in plots further down (e.g. Figure 7). Therefore in practice the best f/stops for the two strategies are to be found at the edges of the purple area.
For the wafflers among us, those who can’t decide whether to favor Subject or Distance and just want a single figure at every field depth, a dashed line representing the best compromise between the two ends of the range is shown.
A little more detail
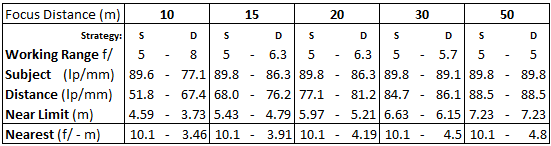
To better understand the compromises that are being made when selecting an f/stop within the range you can take a look at the data in the tables below. At each focus distance of interest ‘S’ represents the f/stop that will result in the best resolution of a Subject placed at the in-focus plane, ‘D’ best resolution in the Distance, 1 Km away. MTF50 spatial resolution at the Subject and at Distance is shown below each case.
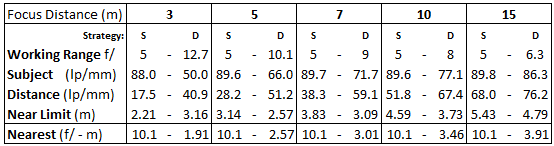
The next row shows the closest that ‘acceptable sharpness’ is achieved from the front of the lens for the given f/stop and focusing distance (usually known as the DOF Near Limit). Finally, below the line we find the f/stop at which nearest ‘acceptable’ resolution is achieved and at what distance. This f/stop is obviously also close to where maximum Depth of Field is produced.
With the subject at 30m and beyond DOF is such that best sharpness apertures around f/5-5.6 can be used.
For instance, using the old strategy of focusing two-thirds of the way to the subject for best DOF appears to gain about 1m of near limit compared to focusing on the subject itself, for subject distances from 15m on up (e.g. focusing at 10m when the actual subject is at 15m). You can read in Table 2 the penalty in lost sharpness, which decreases with increasing focusing distance. Having seen these figures I personally wouldn’t use this rule with subjects closer than 20m at this focal length. Recall that a difference in MTF50 resolution of 10% is noticeable (5% with a trained eye).
Of course it does not make sense to maximize sharpness at a distance when focusing very close by, because DOF becomes quite shallow in those situations. In such cases it is usually best to maximize sharpness at the subject or go for DOF, capping working f-number at f/10 in practice (sharpness in the distance makes it above 50 lp/mm when focusing at 5+m with a focal length of 24mm).
An Example: Shooting Cooky
It’s been a while but I think my trusty model Cooky was about 7m away when I snapped the capture in Figure 1. If I had had this information (and the graphs further down in the article) I should have dialed in f/8 or f/9 (and definitely no more than f/10, for closest acceptable sharpness). That would have given me the flowers, 3m away, above 50 lp/mm – and the trees and the mountains in the distance well above that. On the other hand at f/16 I had to settle for a maximum of about 45 lp/mm throughout. Plus the lower f/stops would have allowed a two stop faster shutter speed, which would have better frozen her movement. [*]
What say you, Sunny 16? And who knew that the closest DOF Near Limit would be achieved at f/10 throughout? Come to think of it, the far f/stop is lower than I expected for the whole distance range.
So that’s how Aperture and DOF parameters interact in a Landscape situation for similar cameras and kit in the center. Feel free to peruse the Guideline Chart and Tables above and stop reading here. If on the other hand you are a doubting Thomas like me, interested in the what and why, the next sections is where the rubber meets the road.
In Depth: Visualizing Field Sharpness
Let’s say that we decide to focus at 10m (33′) with an aperture of f/8. What will the relative ‘sharpness’ be throughout the Depth of Field, in the center of the field of view for this exercise? Time to fire up the model developed in the last few articles.

There is always the possibility of human error whenever I am involved but I feel fairly comfortable with these plots.[1] The measure of sharpness shown are System MTF50 resolution in lp/mm (the blue curve) and CPIQ Edge Acutance[2] (the orange one, part of smartphone standards) calculated in Figure 3 at every distance between 1 and 1000 meters from the front element of the lens. The horizontal axis is logarithmic. Acutance is calculated for my typical pixel peeping conditions, 16″ away from a 24″ monitor, 1920×1200 pixels viewed at 100% zoom.
They both appear to carry similar information, so I would think that the figures might be somewhat different but the conclusions about the same. Acutance seems to show smoother peaks, suggesting less immediate correlation between hitting ‘focus’ perfectly and perceived sharpness. However, I don’t know how to interpret absolute values of Edge Acutance.[*] On the other hand I know that MTF50 resolution above 50 lp/mm indicate good captured spatial resolution. Therefore I am going to use System MTF50 as a metric for this series, with 50 lp/mm as the MTF50 threshold for acceptable sharpness.[3]
Three Depth Sharpness Regimes
Focusing distance determines the shapes of the sharpness curves for a given kit, focal length and f-number, as shown for a near, intermediate and far case below. Both measures display the same trends: they increase relatively quickly from near the lens to the point of focus, around which they peak, and then decay more or less slowly to a limiting value at a vanishing distance, as shown below with MTF50 for a focusing distance of 1m, 5.6m and 1km.
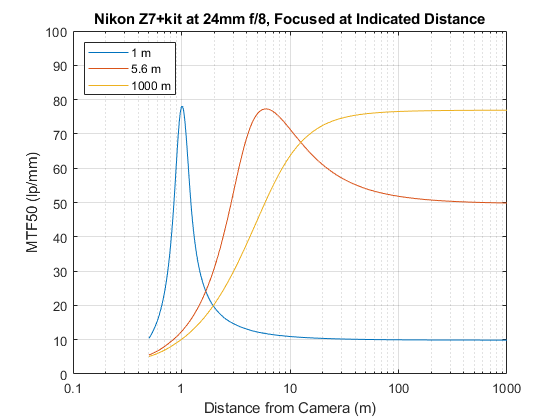
All curves in situations that warrant such investigations show these three regimes: more or less quick rise, peak near focus, and decline. Our job is to choose parameters that result in the sharpness profile that best suits our artistic vision for the scene.
Interpreting the Plots
You can see that in Figure 3 at f/8, having focused on a subject 10m away, the near limit threshold is reached at 3.726 meters, peak MTF50 is 77.1 lp/mm and the resolution at 1 Kilometer is 67.4 lp/mm – not a bad compromise between near, target and far distances. There is no finite ‘DOF’ because the threshold for the far limit is never crossed, we have gone hyperfocal. The distance at which the near resolution is the same as at infinity (1 Km in this investigation), is 5.63m so we could say by looking at the blue curve that anywhere between 5.63m and infinity spatial resolution is going to be better than 67.4 lp/mm, with a peak at the in-focus plane. What would happen if we used f/4 instead?

At f/4 the Near DOF Limit is at 5.10m, peak and vanishing resolution are 82.7 and 39.8 lp/mm respectively. The Far 50 lp/mm threshold is crossed at 36.54m for a total DOF of 31.44m. The near distance equal to the vanishing resolution is 4.2m, meaning that everything from 4.2m to infinity is going to show MTF50 greater than 39.8 lp/mm.
Figure 6 shows such data at every f/stop for the kit focused at a distance of 10m. All the information is there but the plot is hard to read without 3D rotation.

A more Synthetic Sharpness Chart
Since I don’t know how to do 3D rotating plots easily in WordPress I am going to show simplified charts with just the key information in the rest of the article. Enter the Aperture-Distance Resolution plot, seen below in Figure 7. The horizontal axis is the in-camera f-ratio in 1/3 of a stop increments.
The black left vertical axis refers to distances, with all relative curves shown in black. The solid black curves are distances from the front element of the lens to the Far and Near DOF limits based on the chosen MTF50 threshold of 50 lp/mm. The distance between the two solid black curves is the Depth Of Field. For instance at f/4.5 the Near and Far limits are 4.84 and 81.23m for a DOF of 76.39m. When the Far limit black curve disappears it means that the resolution at the infinity/vanishing point, here taken to be 1 Km, is above the threshold and therefore all distances beyond the near limit will be considered acceptably ‘in focus’. The dashed black curve represents the distance from which image resolution will be better than at vanishing, we’ll have more to say about it a little later.

The blue right vertical axis represents MTF50 spatial resolution in lp/mm, all related curves are shown in blue. The solid blue curve is the peak resolution at the given f-number, achieved around the in-focus distance. In this case the maximum resolution is at f/5, 89.6 lp/mm. The dashed blue curve is the vanishing resolution at 1km, here peaking at 67.4 lp/mm at f/8. We know from the shape of the defocus curve in Figure 4 that from the in-focus point to infinity the MTF50 spatial resolution of the green raw channel in the center of the captured image falls between the two blue curves. So in the case below a good compromise appears to be around f/7.1, which yields a similar vanishing resolution than at f/8 or f/9 but with a higher peak resolution.
What about performance between the lens and the in-focus plane? We look at the solid black curve, referred to the left vertical axis, and we note that choosing f/7.1 instead of f/8 causes the near limit to shift only from 3.73 to 3.92m, about 8″. And the dashed black curve tells us that at f/7.1 all distances from 5.45m to infinity are going to have better resolution than the vanishing resolution of 67.0 lp/mm, a cosmic balance of sorts.
Of course one may decide to maximize the sharpness of the subject at 10m by instead shooting at f/5, in which case MTF50 resolution there will be about 89.6 lp/mm and all distances from 4.72m to infinity will have better resolution than 51.8 lp/mm, above the DOF threshold. The near limit in this case occurs at 4.59m. Or perhaps one might have reason to choose a compromise in between, balancing near/target/infinity resolution for one’s objectives.
In the end, based on these charts, are there any landscape scenarios that would require higher f/stops than f/10, with the loss of resolution throughout the field that that would entail?
Even More Synthetic
Upon further thought, however, it becomes apparent that there are virtually no advantages in terms of resolution, though many disadvantages, to using f-ratios lower than the peak in-focus solid blue curve at f/5 and higher than the peak of the vanishing dashed blue curve at f/8, so this is the useful working f/stop range for the kit as set up at this focusing distance in the center.

In fact it is clear that, because both curves vary slowly near their peaks, very little is given up by moving 1/3 of a stop from the edges towards the center of the range, so for this combo the smarter range is really f/5.7-f/7.1. Choose f/5.7 if you want to maximize the sharpness of the in-focus plane or f/7.1 for best resolution at a distance. I will call f/6.3 the best compromise of the range because it is the relative aperture at which the in-focus and vanishing curve slopes are the opposite of each other. This means that moving up or down one click will lose more resolution in one than is gained in the other.
The only reason why one may want to step outside of the working range would be for artistic reasons or in an emergency, to obtain the absolutely closest near limit possible, which occurs at f/10.1. So to summarize, for the Z7+24-70mm/4 on a tripod focused at 10m in the center, we can show the following f/stop summary based on sharpness strategy:
| Focus at 10m | f/stop | Subject - Distance | Near Limit | DOF |
|---|---|---|---|---|
| Strategy: | lp/mm | m | m | |
| Subject | 5 | 89.6 - 51.8 | 4.592 | inf |
| Distance | 8 | 77.1 - 67.4 | 3.726 | inf |
| Nearest | 10.1 | 66.0 - 62.4 | 3.460 | inf |
| Compromise | 6.3 | 86.3 - 63.7 | 4.129 | inf |
The Guideline chart in Figure 2 represents a summary of this data at a number of relevant focal distances. Below you can find detailed Aperture-Distance Resolution plots for each of them (focusing distances of 1 and 2m were added later per a request, note the change of scale on the left axis).
Focus at 1m

Focus at 2m

Focus at 3m

Choosing a distance of 3m from the lens as the in-focus plane forces interesting compromises. First it is obvious by looking at the dashed blue curve that no matter the f-number the background never makes it to the 50 lp/mm threshold, reaching a maximum at f/12.7-14.3. Therefore when focusing at 3m a good strategy would be to go for subject sharpness and background separation around f/5.7 – or for DOF, no higher than f/11.
This is the only focusing distance where going past f/10 would seem justified. Even then, loss of sharpness at the Subject is not immaterial.
| Focus at 3m | f/stop | Subject - Distance | Near Limit | DOF |
|---|---|---|---|---|
| Strategy: | lp/mm | m | m | |
| Subject | 5 | 88.0 - 17.5 | 2.210 | 2.173 |
| Distance | 12.7 | 50.0 - 40.9 | 3.156 | 5.054 |
| Nearest | 10.1 | 66.2 - 35.7 | 1.911 | 6.177 |
| DOF | 11.3 | 60.6 - 38.8 | 1.915 | 6.414 |
Note how the near/far limit split from the in-focus distance of 3m is somewhat even at f/4 (-0.68/+0.87m) while it is heavily skewed at f/10 (-1.09/+5.09m). Two/thirds rule anyone?
Focus at 5m

| Focus at 5m | f/stop | Subject - Distance | Near Limit | DOF |
|---|---|---|---|---|
| Strategy: | lp/mm | m | m | |
| Subject | 5 | 89.6 - 28.2 | 3.142 | 7.30 |
| Distance | 10.1 | 66.0 - 51.2 | 2.567 | - |
| Nearest | 10.1 | 66.0 - 51.2 | 2.567 | - |
| Compromise | 7.1 | 82.0 - 41.0 | 2.810 | 20.97 |
Focus at 7m

When focusing at 7m f/8 looks like a good compromise for depth of field, with a near limit of 3.21m and everything between 3.70m and infinity producing higher resolution than 57.3mm lp/mm. Higher f/stops are a losing proposition all around. For better in-focus sharpness we’d be giving up background focus relatively fast and higher f/stops result in worse sharpness everywhere except at the near limit, that however only gains a few centimeters.
It is abundantly clear from these plots that, even though the camera and lenses were different, my choice of f/16 for the capture in Figure 1 was woefully inadequate.
| Focus at 7m | f/stop | Subject - Distance | Near Limit | DOF |
|---|---|---|---|---|
| Strategy: | lp/mm | m | m | |
| Subject | 5 | 89.7 - 38.3 | 3.833 | 21.83 |
| Distance | 9 | 71.7 - 59.1 | 3.088 | - |
| Nearest | 10.1 | 66.0 - 58.2 | 3.014 | - |
| Compromise | 6.3 | 86.2 - 49.1 | 3.504 | 252.4 |
Focus at 10m

| Focus at 10m | f/stop | Subject - Distance | Near Limit | DOF |
|---|---|---|---|---|
| Strategy: | lp/mm | m | m | |
| Subject | 5 | 89.6 - 51.8 | 4.592 | inf |
| Distance | 8 | 77.1 - 67.4 | 3.726 | inf |
| Nearest | 10.1 | 66.0 - 62.4 | 3.460 | inf |
| Compromise | 6.3 | 86.3 - 63.7 | 4.129 | inf |
Focus at 15m

Note that as the in-focus plane moves away the peak of the dashed blue curve, representing the spatial resolution at infinity, keeps moving up and to the left, meaning that lower and lower f-numbers are necessary to achieve maximum sharpness there. With the in-focus plane at 15m any f/stop higher than f/6.3 is giving up resolution from the subject to infinity, while gaining little in terms of the near limit (4.79m at f/6.3).
| Focus at 15m | f/stop | Subject - Distance | Near Limit | DOF |
|---|---|---|---|---|
| Strategy: | lp/mm | m | m | |
| Subject | 5 | 89.8 - 68.0 | 5.427 | inf |
| Distance | 6.3 | 86.3 - 76.2 | 4.794 | inf |
| Nearest | 10.1 | 65.9 - 64.6 | 3.912 | inf |
| Compromise | 5.7 | 89.1 - 73.6 | 5.096 | inf |
Focus at 20m

| Focus at 20m | f/stop | Subject - Distance | Near Limit | DOF |
|---|---|---|---|---|
| Strategy: | lp/mm | m | m | |
| Subject | 5 | 89.8 - 77.1 | 5.970 | inf |
| Distance | 6.3 | 86.3 - 81.2 | 5.210 | inf |
| Nearest | 10.1 | 65.9 - 65.3 | 4.194 | inf |
| Compromise | 5.7 | 89.1 - 80.8 | 5.571 | inf |
Focus at 30m

| Focus at 30m | f/stop | Subject - Distance | Near Limit | DOF |
|---|---|---|---|---|
| Strategy: | lp/mm | m | m | |
| Subject | 5 | 89.8 - 84.7 | 6.632 | inf |
| Distance | 5.7 | 89.1 - 86.1 | 6.148 | inf |
| Nearest | 10.1 | 65.9 - 65.7 | 4.500 | inf |
| Compromise | 5 | 89.8 - 84.7 | 6.632 | inf |
Focus at 50m

As focus distance increases the two blue curves are almost right on top of each other, meaning that peak resolution and that at infinity are almost the same. At both 30m and 50m I would choose f/5-5.6 as the best compromise, which would put the near limit between 6 and 7 meters. Moving to the nearest limit f/stop, f/10, would gain a couple of meters.
| Focus at 50m | f/stop | Subject - Distance | Near Limit | DOF |
|---|---|---|---|---|
| Strategy: | lp/mm | m | m | |
| Subject | 5 | 89.8 - 88.5 | 7.275 | inf |
| Distance | 5 | 89.8 - 88.5 | 7.275 | inf |
| Nearest | 10.1 | 65.9 - 65.8 | 4.800 | inf |
| Compromise | 5 | 89.8 - 88.5 | 7.275 | inf |
To close the circle and remind ourselves where those figures come from, here is the actual spatial resolution plot with focus at 50m and relative aperture of f/5. Aha.

The summary of all these findings is the guideline plot shown in Figure 2 and the two tables below it. Next I will tackle the 35mm focal length for the same kit.
It’s not easy to digest all this information and present it in a meaningful, intuitive way. I welcome comments and suggestions for improvement.
Notes and References
1. Jim Kasson came at the problem by assuming that the PSF of the CoC is a solid disk. His results are in line with those in this page and can be found here.
2. See “Development of the I3A CPIQ spatial metrics, Baxter et al.” for the Camera Phone Image Quality initiative’s definition of Edge Acutance.
3. For reference and with a bit of hand waving, an MTF50 of 50 lp/mm corresponds to a Circle of Confusion diameter of about 14 microns, since the MTF50 of the FT of a disc is 0.7051 (.7051/.05=14.1). In fact playing around with online DOF calculators it seems that results presented here correspond roughly to a CoC of about that +/- a couple microns.
4. The Matlab code used to generate these plots can be downloaded from here.
For some of us, “subject” equals everything visible within the frame. I never think in terms of pre-modern formal ideas like subject/field dichotomies.
Is there a simplified way to think about this that only takes into account the nearest and farthest object that you want to keep within a maximum CoC?
Hello PR, welcome to the bottom of this article. Congratulations I think you are one of the few readers who made it this far 😉
With regards to your question, MTF50 can be considered to represent a certain maximum CoC. The nearest and farthest ‘acceptable’ distances depend on focus distance, so the ‘Focus at X meters’ charts near the bottom should do the trick.
Jack