We know that the best Information Quality possible collected from the scene by a digital camera is available right at the output of the sensor and it will only be degraded from there. This article will discuss what happens to this information as it is transferred through the imaging system and stored in the raw data. It will use the simple language outlined in the last post to explain how and why the strategy for Capturing the best Information or Image Quality (IQ) possible from the scene in the raw data involves only two simple steps:
1) Maximizing the collected Signal given artistic and technical constraints; and
2) Choosing what part of the Signal to store in the raw data and what part to leave behind.
The second step is only necessary if your camera is incapable of storing the entire Signal at once (that is it is not ISO invariant) and will be discussed in a future article. In this post we will assume an ISOless imaging system.
Maximizing the Signal Collected from the Scene
The first objective is pretty intuitive: the larger the signal, the higher the Signal-to-Noise Ratio (SNR), the better the IQ. You achieve it by maximizing Exposure at base ISO making sure no needed highlights are clipped. If some are, reduce Exposure until they are just no longer clipping. Recall that Exposure is proportional to Luminance from the scene and exposure time, while it’s inversely proportional to f-number squared – so play with these variables within the boundaries of your artistic constraints (sharpness, DOF, motion blur, etc.) to get it right. If there is too much light, use a neutral density filter to cut it down. Pretty straightforward stuff, sometimes referred to as exposing to the right (ETTR). What are we doing from an information transfer perspective?
Transferring Scene Information to the Raw Data File
Digital cameras for photographers are effectively linear imaging devices. This means that once you have chosen how to map a single Signal level out of the sensor into a raw data level, you have defined how all remaining tones from the scene will be stored to raw data for that capture. We call this mapping function the System’s gain (g in the picture below): so many photoelectrons in (e-), so many raw levels out (DN). Double/halve the e- in, double/halve the DN out.

The mean Signal of 5 DN written to the raw file in the example above assumes that the camera’s ISO is set to 100. If it were set to 400 a mean value of 20 DN would be written to the raw file instead.
Channel Capacity = DR
This mapping is not boundless because it is necessarily constrained by the physical characteristics of the devices in the imaging system, what we normally collectively refer to as its Dynamic Range (DR). For instance the first upper bound is set by the pixel’s capacity to collect and hold photoelectrons, often referred to as Full Well Capacity or Saturation.
Recall from the previous article that the signal is the mean output of a limited number of pixels in a uniformly lit region of interest (the sample), so its value is not necessarily an integer: for instance if the sample under investigation is a patch of 20 pixels, all zero except for one with a value of 1 DN, the mean Signal is 0.05 DN. Therefore the lower bound for the Signal is not a hard number as it is for the highlights but it is related to the photosite’s electronic noise ‘floor’, which unavoidably contaminates the lowest Signals, at a certain point making them too noisy to be useful. As the Signal is lowered into the deepest shadows we can think of it as sinking into the noise. SNR will keep dropping to the point that the relative information is no longer useful for the intended application. For instance signals with an SNR less than 1 may be considered to be unacceptable in some applications. In others it may be an SNR less than 5, 10 or other threshold.
By selecting a certain Exposure we have effectively decided what portion of the tonal information from the scene to allow onto our imager. That portion of the information that falls above the sensor’s saturation capacity will be clipped off; that which falls below the minimum acceptable quality level will be recorded with unacceptable IQ. Our choice, controlled solely by shutter speed and f-number (Exposure) for the given scene.
Collecting Information from the Scene
For example, if while shooting a landscape we decide that the brightest highlights we wish to retain some detail in are the clouds in an otherwise green, snow topped mountain scene – and choose shutter speed and f-number at base ISO so that the brightest highlights in the clouds show up just below saturation with our other artistic constraints taken care of – we are done: all other tone information will fall linearly into place. Here is a typical example from a fictitious semi-pro Digital Still Camera. The Exposure is chosen such that – after photons arrive at the sensor, go through various filters and get converted to photoelectrons – the Signal from the clouds is just below saturation:
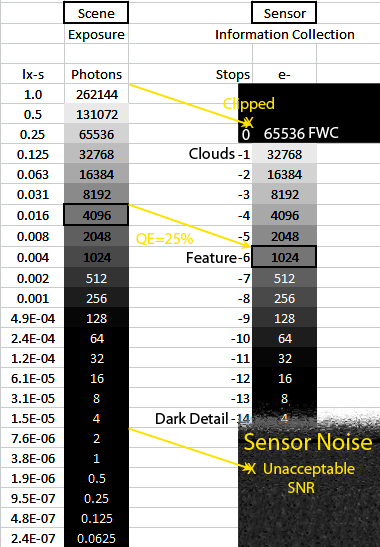
Any scene information brighter than the clouds, like for instance a glacier at the top of the mountain, will be clipped and not be collected by the sensor. At the other end of the tonal range any scene information darker than the lowest acceptable signal, like for instance from shadows under trees, will be collected with unacceptable IQ. But given our artistic and technical constraints, by ensuring that the brightest desirable highlights fall just below sensor saturation we have collected the best Information Quality possible from the scene.
Note that so far ISO has not entered the picture, because the amount of light (the number of photons) that is seen by a pixel during Exposure is controlled solely by shutter speed and aperture.
Storing Collected Information: the ISOless Case
Now that our photosites have been placed in the position of collecting the best tonal information from the scene based on our artistic intent we would like our digital camera to store this information as best it can, without losing any along the way or contaminating it with additional noise.
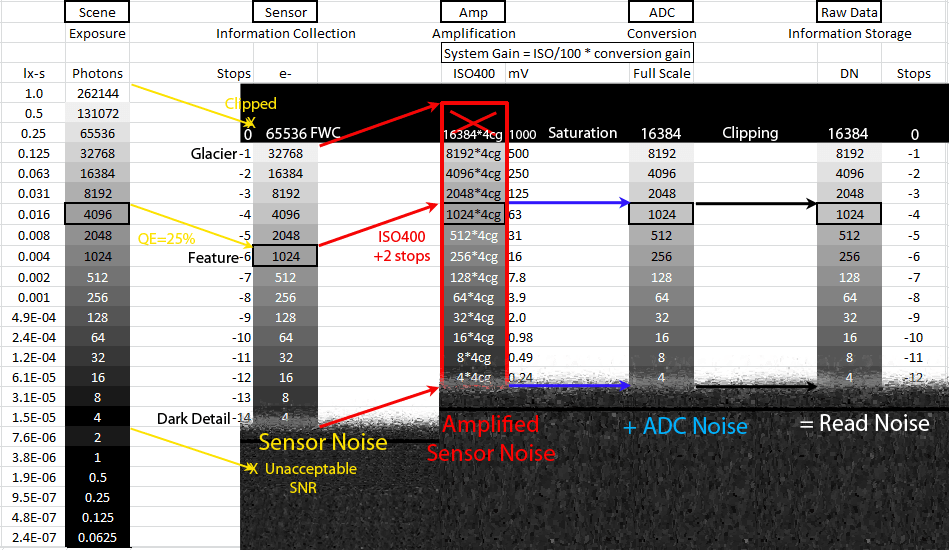
The process to accomplish this is fairly simple: photoelectrons (e-) collected by the photosites are put through various stages of linear amplification, then converted to digital numbers by an Analog to Digital Converter and finally stored in a file as raw values (referred to as DN or ADU, see figure 1 above).
For a first easy pass, let’s assume that there is only one amplifier that feeds e- to the ADC, adding little or virtually no noise to the system, as per the figure above (this last part is often the case). And while we are at it, let’s assume that the path to the ADC and the ADC itself are also ideal, adding no additional noise either (this is only sometimes the case as we will see in a future post). The result of these assumptions is shown below. Such an imaging system is often referred to as ISOless or ISO invariant in photographic circles, meaning that little or no additional noise is added after scene information has been collected by the sensor; therefore changing the amplification by raising ISO has little or no impact on SNR at the given Exposure:

Simplifying for clarity and ignoring shot noise, each stage in this example simply passes the information along linearly without adding noise. The tones collected by the photosites are amplified, converted to digital and stored with effectively unchanged IQ. At base ISO, let’s assume it’s 100, the amplification provided by the amplifier (cg, in millivolts per e-) is designed by the manufacturer so that pixel saturation (say 65535e-) corresponds to the highest input voltage accepted by the ADC (say 1000mV), which produces the highest output value out of it (say 16383 DN in 14-bit mode). In the example above, this corresponds to a system conversion gain ratio of 1:4, that is 4e- out of the sensor produce 1 DN in the raw data at base ISO. Since base ISO in the example above is 100, system gain is simply g = 0.25 DN/e-.
Everything is linear, so a tone with mean signal 1024e- will be stored as a raw level of 256 DN, and so on. Sensor noise (say a standard deviation of 4e- out of it, with no input signal) shows up as a standard deviation of 1 DN in the raw data. All the tones collected by the sensor are faithfully stored in the raw data with no additional noise by the amplifier and ADC, in this ideal ISO invariant example. Therefore Engineering Dynamic Range is unchanged at 14 stops throughout the stages: log2(65535/4) out of the sensor = log2(16383/1) in the raw data. And so is SNR because both the Signal (mean of sample) and the Noise (standard deviation of sample) are multiplied by the same factor, therefore their ratio remains unchanged. Information (IQ) has been fully transferred from the sensor to the raw data.
Raising ISO in an ISO Invariant Camera
What happens if we raise ISO from base keeping Exposure constant – meaning we keep the mean signal out of the sensor constant – and we raise amplification of the signal out of the sensor before the ADC with an ISOless camera? Compared to base ISO, raising ISO in-camera will simply multiply the output of the sensor, therefore by definition all Signal and Noise, by a factor approximately equal to the ISO divided by 100 . For instance, if base ISO gave the tonal transfer results shown in the previous figure, ISO 400 will increase the Signal and Noise levels fed to the ADC by a factor of 4, or two stops. If before the output of a certain pixel resulted in an ADC count of 256 DN, now it will be 1024 DN. System gain is now four times what it was before, so g = 1 DN/e-. Since both the Signal and related Noise (the mean and standard deviation of data in a sample patch) are both amplified by the same factor, their ratio (SNR) will however be unchanged in the shadows.
If the ADC did not saturate, all information would be transferred to it with the same IQ. But the ADC does saturate and the signal from the clouds was just below saturation at base ISO, so by amplifying the Signal out of the sensor 4x we end up pushing some of the desirable scene information including the clouds beyond the capabilities of the ADC. A Signal above saturation produces a constant level at the ADC’s highest output value, therefore ‘clipping’ it. That information from the scene is lost forever. On the other hand, at the other end of the range in the deep shadows, noise out of the sensor will also be amplified by 4x, so eDR is now only 12 stops: log2(16383/4). Therefore while the SNR of the surviving tones has not been affected as a result of increasing ISO, we have lost two stops of eDR.
If you raise the ISO further you can easily follow the reasoning above to see that things only get worse: no better SNR, only lost eDR. And that means that information from the sensor has not been fully transferred to the raw data, losing some along the way.
So if your objective is to maximise Image /Information Quality (IQ) in the raw data, once you have maximised the Signal (Exposure) subject to artistic and technical constraints, why raise the ISO above base when shooting with an ISOless/invariant camera?
There may be some practical reasons, like for instance needing an acceptably bright image on the camera’s screen or OOC at the time of capture. But some photographers do not try this approach even when it would be useful to them simply because they are afraid of inducing (contour) banding. Next.
Your means of explaining aall in this piece of writing is truly pleasant, every one be
capable of simply be aware of it, Thanks a lot.
Hi there! Very nice explanation. I have been trying to get my head around this, as so many articles have differing takes. Such as, for an ISO-invariant camera, ‘read noise does not change with a change to the camera’s ISO setting’. This seems to imply that it actually does not matter what ISO is set in-camera; we may as well just use whatever produces a nice jpeg preview, given our desired shutter/aperture, and still be able to adjust the raw in post. But according to your explanation, we are in fact still advised to use base ISO not due to noise as such, but more that the ISO setting causes amplification that may cause loss to highlight data. Do I have that correct?
Close enough, Cass, unless you need a properly brightened jpeg right out of camera.
Hi Jack, thank you. Still a bit confused, apologies. If you have a moment… What many posts around are saying is that with an ISO-invariant camera, we should use base ISO regardless. So, suppose we have a chosen exposure at 1/250-F1.8 to stop movement and have shallow depth of field, and using that, we need an ISO of 3200 to expose those clouds (in your example) at a level just below top end saturation, it is said that there is some advantage to shooting that shot, 1/250-F1.8 at base ISO instead, and do the amplification in the post-process raw converter. Why is that better than doing the amplification in camera by raising ISO? If you have time, many thanks…
Well, if the camera is truly isoless and there is no detail that you may be interested in brighter than saturation at ISO3200 then in theory it makes no difference whether you dial in 3200 ISO, base or anything in between – except that in one case you may get a pleasingly bright jpeg OOC and in the other a safer highlight headroom cushion (in your example the sensor would be blown to smithereens, assuming a sunny 16 day:-). In practice though the camera is not truly isoless and/or there may be detail above ISO3200 saturation that you’d be missing (say fast moving indoor sports like hockey): in that case it makes sense to choose a compromise ISO somewhere between where the camera becomes ISOless and where all desirable highlights are safely captured in the raw data. On the other hand I am personally almost never in that situation with landscapes, ETTR’d (often) on a tripod: I almost never need to raise ISO from base because that’s how the camera produces the best SNR/DR combo. So I go raw at base, ignore OOC brightness and fix it the way I like it later during raw conversion.
Hi Jack, thank you for the explanation. I believe I have a better handle on it now. One must beware of ‘everything’ one reads on the internet. Not all is from ‘knowledgeable’ sources, which confused me somewhat. However, much clearer now. Very happy for the advice, again thank you…
PS… My picture was planned to be of a climber on the said mountain (who had a tendency to twitch at heights), and wanted to shoot close and isolate him against any cloud in the background (my largish aperture)… and I, of course, had planned to take the said photo at those exposure settings at dusk, just so as not to blow the sensor away ‘too much’…;)